# VLAB User Guide Edit
VLAB (Verification Laboratory) is X-EPIC's cloud-based online EDA-tool service platform, which provides you with an out-of-the-box experience of X-EPIC products via remote desktop. VLAB provides a series of Verilog lab courses in Gitlab https://gitlab.x-epic.com (opens new window). You can use GalaxSim to compile and run a design, and use Fusion Debug to view waveforms.
The following takes AND gate logic as an example to illustrate the complete process of digital circuit design in VLAB and verification with GalaxSim and Fusion Debug.

# Quick Start
# Step 1: Log on to remote desktop
In the VLAB home page, click Login in the menu bar and then click the register link below to enter the new user registration page.
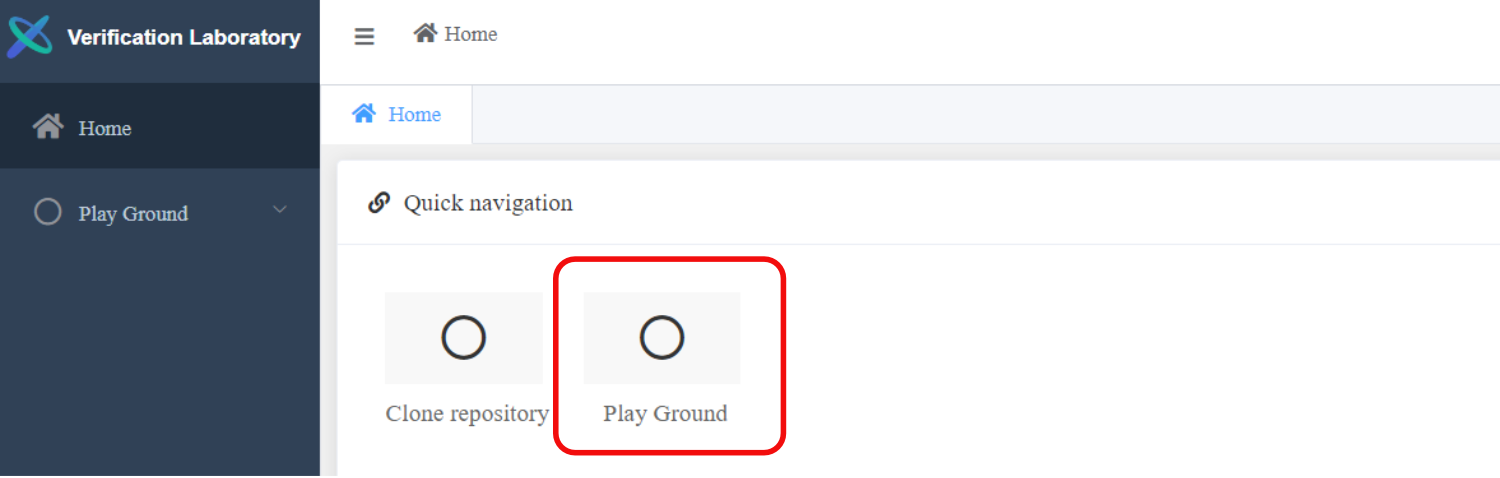
In the VLAB user page, click Play Ground.
In the Play Ground page, click on the Web View button. If the button does not display, click the Start/Restart button first.

Results: The remote desktop opens in a Web page and you login it successfully.
# Step 2: Get Lab Resources
In the VLAB remote desktop, double-click icon
 to open
a terminal.
to open
a terminal.Download the case files. As instructed in the popup window, enter your VLAB username and password.。
git clone https://gitlab.x-epic.com/learning/verilog.git ~TIP
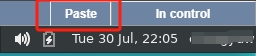
You can copy the command line and then click the Paste button to quick paste it to the terminal.
Enter the lab directory for the AND logic.
cd ~/verilog/andComplete the DUT and testbench.
dut.v: DUT RTL. Refer to the reference file,.dut.v.ref.testbench.v: Testbench code. Refer to the reference file,.testbench.v.ref.
# Step 3: Simulation
Run setup.sh and enter the number 2 and 4 to set up the environments for GalaxSim and Fusion Debug.
source /tools/x-epic/setup.sh FusionDebug+GalaxSim 24.03.00.b037Execute the following command line to compile the design with GalaxSim.
make compileExecute the following command line to run the design.
make runOpen Fusion Debug GUI and load source files.
make debugIn the Wave1:dump.vcd pane, click icon
 ,select the
a,b, andoutsignals, then click OK.Result: You can view that the value of
outis 1 only when bothaandbare 1.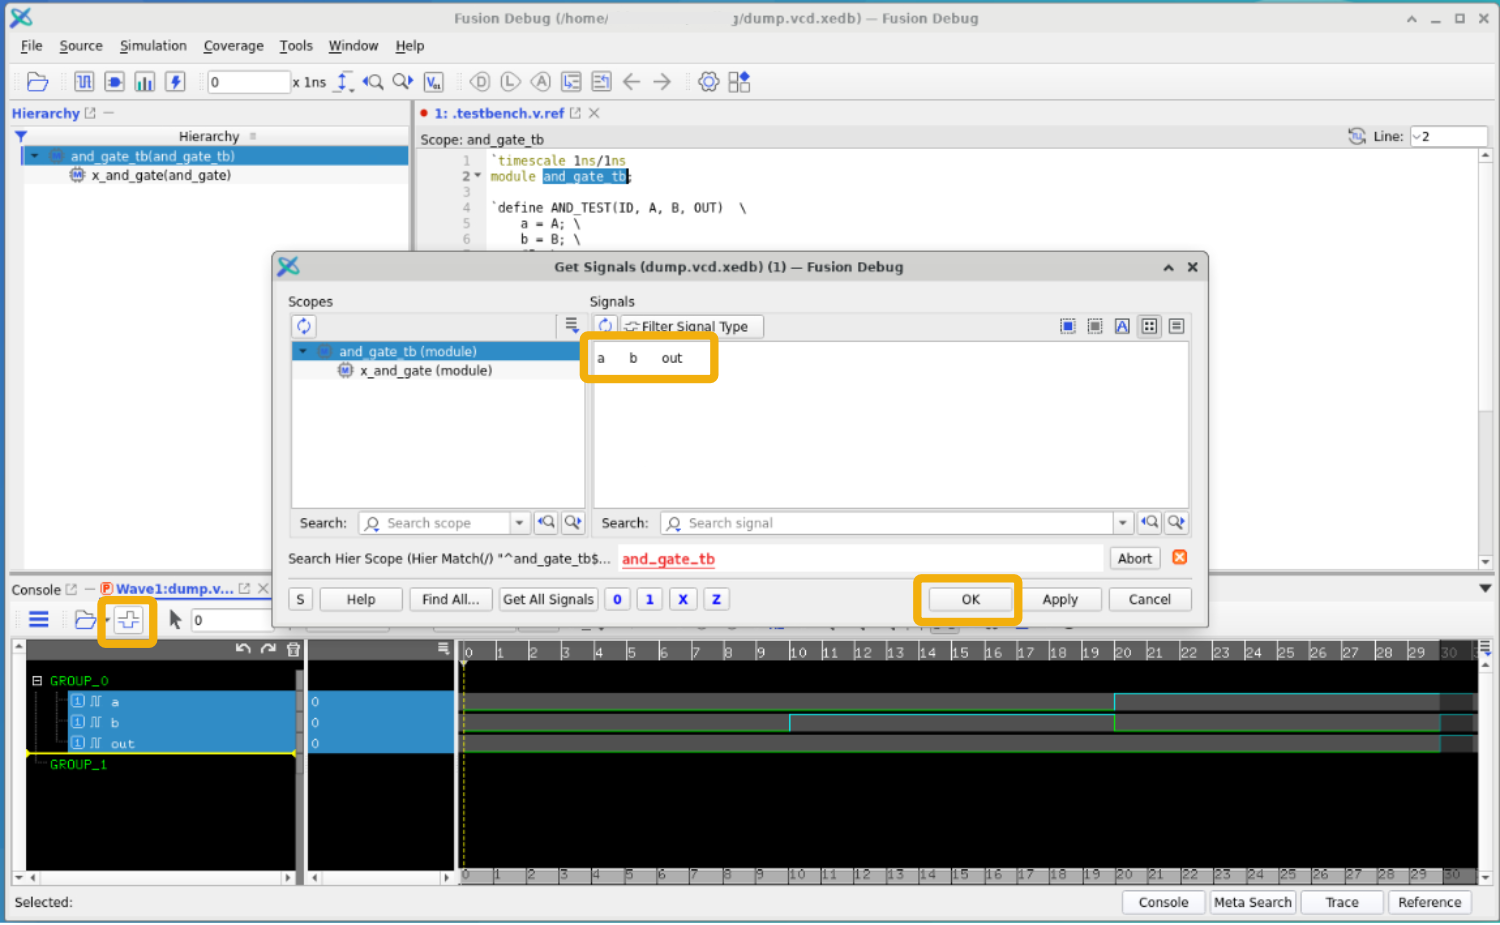
# More Verilog Labs
VLAB provides a series of Verilog lab courses. Each course contains DUT and testbench files. You can use GalaxSim to compile and run a design, and use Fusion Debug to view waveforms.
Gitlab project: https://gitlab.x-epic.com/learning/verilog (opens new window)
# Tutorial of Product Labs
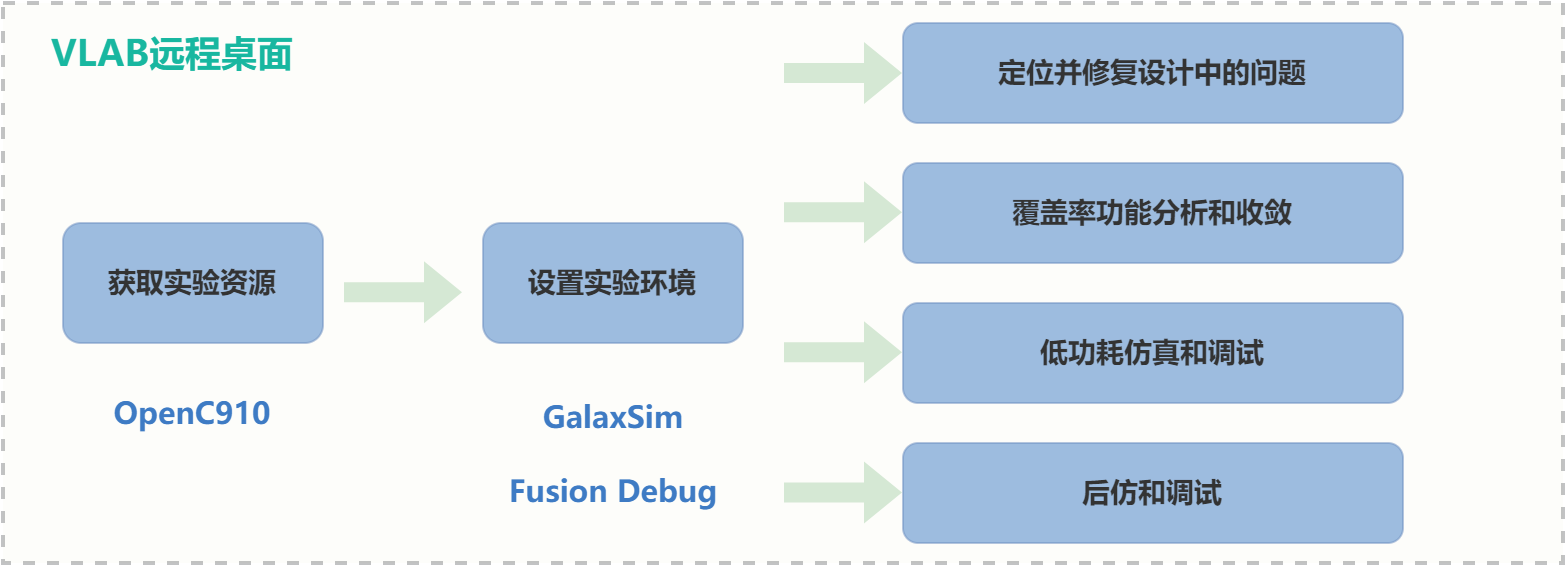
VLAB designs four labs which use GalaxSim in combination with Fusion Debug, and provides detailed instructions.
Gitlab project: https://gitlab.x-epic.com/design/uvm_ahb_and_openc910_coremark (opens new window)
# VLAB Operation Guide
In VLAB, you can clone repositories and upload files and use the built-in version management tools and CI tools. VLAB supports various verification products, and provides use cases with one-click environment configuration scripts for users to get started quickly. If you meet any problem, refer to FAQs or ask for supports.
# Use Gitlab
You can use Gitlab in public network environment or in VLAB remote desktop to manage and share code.
-
In public network environment, visit Gitlab URL https://gitlab.x-epic.com (opens new window). Use VLAB username and password to log in to Gitlab.
In VLAB remote desktop, double-click icon Gitlab to visit and log in to Gitlab.
# Use FusionFlex
FusionFlex is the X-EPIC Agile Verification Managener, which supports dynamic tracing and visualization of verification flow. You can use FusionFlex in public network environment or in VLAB remote desktop.
-
In public network environment, visit FusionFlex URL https://fusionflex.x-epic.com/ (opens new window). After login, you can get an overview from the Dashboard menu and submit jobs in the Workspace menu. For more information about using FusionFlex, click the Doc icon in the top right corner of web and refer to the user guide.
In VLAB remote desktop, double-click icon FusionFlex to visit and log in to FusionFlex. You can also use
xjobCLI commands in terminals. For more information about the command usage, execute thexjob -hcommand line.
# Clone an external Git repository
Clone an external Git repository in one of the following ways:
TIP
Currently, only public repositories in Github and Gitee are supported.
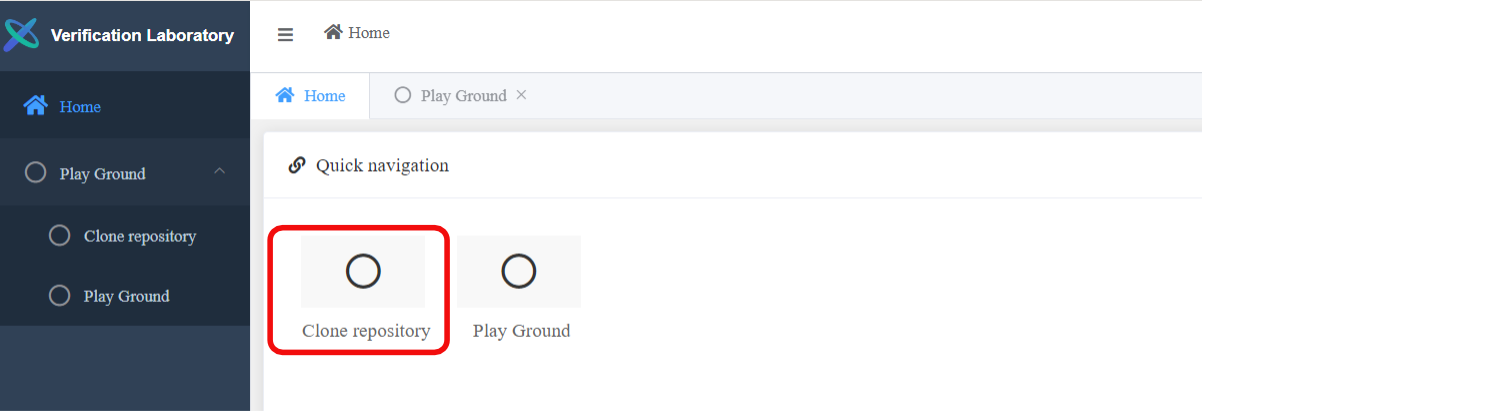
In the VLAB user page:
Click the Clone repository button.
Click the Add button.
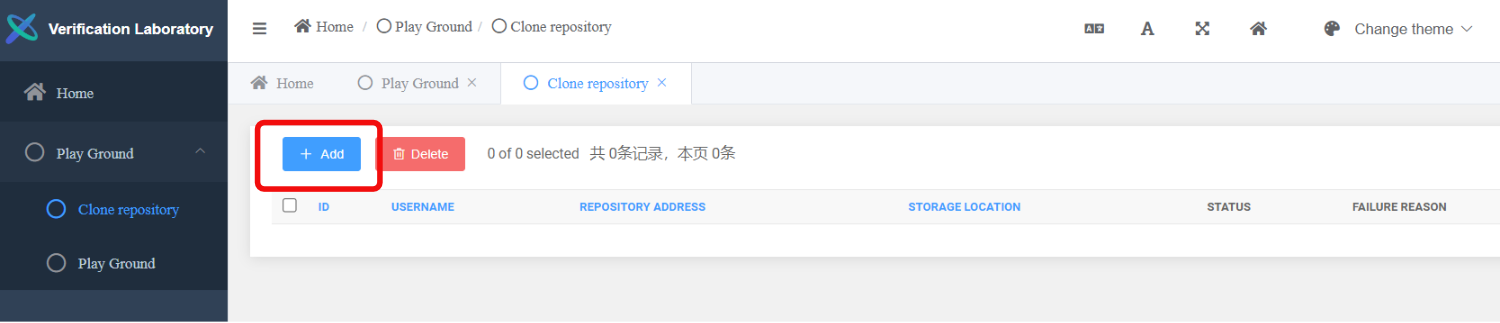
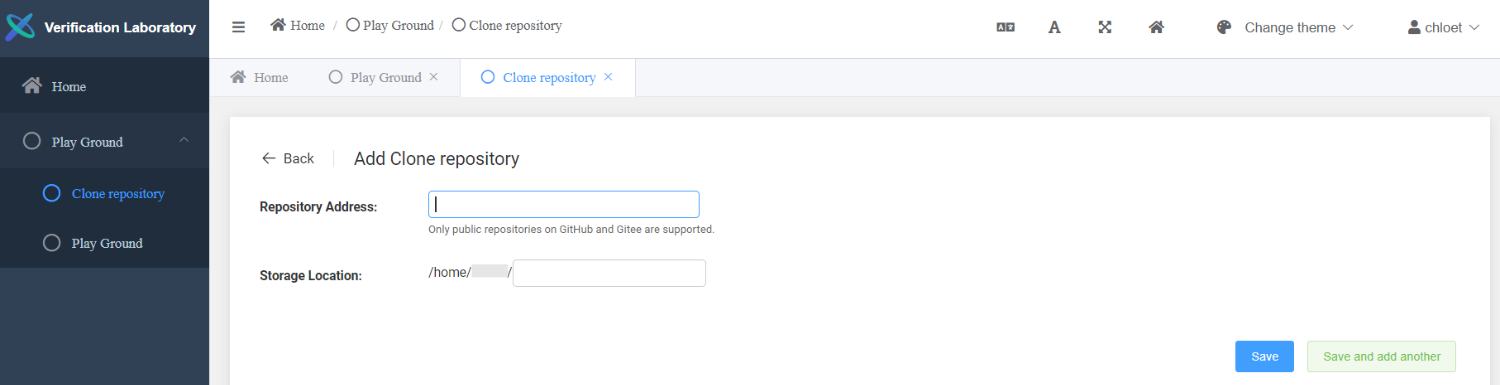
Enter the repository address of Github or Gitee and local storage address. Click Save to return to list page.
In the list page, click on the Refresh icon to check the status of the clone.

In the VLAB remote desktop:
- Open a terminal.
- Use
git clone <repo_url> <local_path>command to clone a repository.
Results: Cloning records display in the VLAB user page.
# Copy and paste texts
You can copy local texts to the VLAB remote desktop.
Copy local texts.
Click the Paste button in the top right corner of the VLAB remote desktop。
# Upload local files
You can upload local files to the VLAB cloud server.
Login VLAB.
In the VLAB user page, click the Upload file button.

In the Upload File dialog, select files and wait for the upload to complete.

Results: The files are uploaded to the home directory of current user.
# Use Jenkins
You can the Jenkins in VLAB to manage versions.
- Double-click icon Jenkins in the remote desktop.
- In the login page, enter the user name and password used for VLAB login.
# Share the remote desktop
You can share the remote desktop for remote assistance.
- In the Play Ground page, click on the Share button.

- In the pop-up window, select the link based on whether the other user needs operation permission or not.
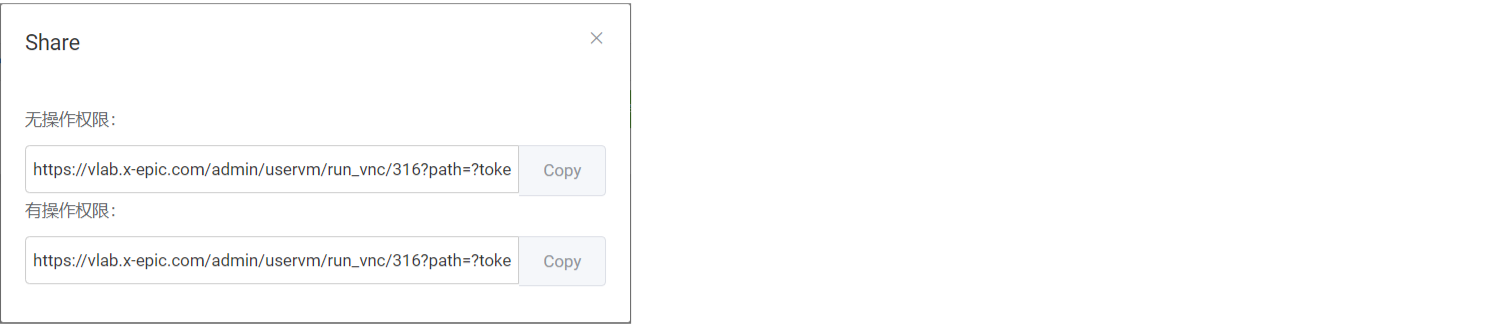
- After opening the link which grants operation permission, the other user can operate on your remote desktop directly.
# Get help information
You can get help information and technical support in the following ways:
Check the FAQs for a list of frequently asked questions and answers.
Click the icon at the bottom right of the remote desktop to contact online customer service. You can also search history records in the dialog.

Book a live demo.
Click Book a live demo button on the VLAB home page, and submit relevant information for booking demo application. Once receiving your application, we will be in touch with you at the first time.
# FAQs
1. How do I access the remote desktop environment?
Click the Test environment List button in the VLAB user page, and then click the Access button to the right of the test environment list to enter. If there is no Access button, click the Start/Restart button first.
2. How to quickly set up environment variables?
You can execute the command line source/tools/x-epic/setup.sh to set the environment
variable and use source/tools/x-epic/setup.sh -h to check details.
Note: After setting up the software environment variable, Quick Start is shown. You can follow the guidance to have an intuitive knowledge of the software.
3. How to upload files
After logging into VLAB, click File Upload button on the right side of Test environment List to upload files.
4. How to access FusionFlex
There are two ways to access FusionFlex:
- Double-click on the remote desktop FusionFlex icon on the desktop
- Open a terminal, then enter the firefox at
http://fusionflex.vlab.cepic.com.
You can use the above methods to open FusionFlex Web page and use the VLAB account to log in. To get
more information about FusionFlex, refer to the FusionFlex document in VLAB: http://fusionflex.vlab.c-epic.com/docs/user-guide/html/FusionFlex-User-Guide.html
5. How to access the version management tools Jenkins?
Jenkins environment is deployed inside VLAB. Double-click the Jenkins icon on the remote desktop, log in with the same account of VLAB, and then manage your project through Jenkins.
6. Is there a demo case for each software?
In the /cases directory, each software product has a readme.md file. You can refer to the file to be familiar with the too usage. Users only have read permission to this directory, so it is recommended to copy the case to your home directory before executing it.
7. Where are the tools in VLAB?
VLAB not only has a variety of X-EPIC tools, but also collects the commonly-used third party tools. At present, all the tools are stored in the /tools directory, users only have read permission without write permission to the directory.
8. How to open VS Code
VS Code has been installed in VLAB. You can execute the code command in terminal to open
VS Code. Commonly-used extensions are also installed.
10. Where is the software documentation?
- GalaxSim (Base Mode): /tools/x-epic/GalaxSim/23.11.00/doc/GalaxSim-User-Guide.pdf
- GalaxSim (Turbo Mode): /tools/x-epic/GalaxSimTurbo/23.11.00/doc/GalaxSim-User-Guide.pdf
- FusionDebug: /tools/x-epic/FusionDebug/23.11.00/doc/Fusion-Debug-User-Guide.pdf
- GalaxFV: /tools/x-epic/GalaxFV/23.09.00.r033/doc/GalaxFV-User-Guide.pdf
- HPE: /tools/x-epic/HPE/23.12.00/doc
You can use firefox to open the documents. For example, execute the following command:
firefox /tools/x-epic/GalaxSim/23.11.00/doc/GalaxSim-User-Guide.pdf`.
The documents are slightly different from version to version. Refer to the documents that correspond to the product version you use.
11. How to clone Github and Gitee repositories?
Currently, VLAB only supports cloning public repositories in Github and Gitee. See Clone an external Git repository for details.
12. How to make Git remember your username and password?
Perform the following steps to configure Git to store your username and password:
In the terminal, execute the command line:
git config --global credential.helper storeExecute the
gitcommand line, such asgit push,git pull,git cloneand so on.Result: A dialog appears, prompting you to enter the username.
In the dialog, click Cancel and enter your username in the terminal.
Result: A dialog appears, prompting you to enter the password.
In the dialog, click Cancel and enter your password in the terminal.
Result: The git command you executed in Step 2 is executed.
How to make shortcut keys take effect in the remote desktop?
Click the Full Screen button in the top-right corner of the remote desktop to toggle the full screen mode. Then you can use the shortcut keys of all applications in the remote desktop.